
In this article, we will review how to install and start using PPM Express Report Pack for Azure DevOps.
Prerequisites:
Before you proceed to the steps below, make sure you have the following:
- Computer with an Internet connection.
- PPM Express report pack. Please download it by this link:
PPM Express report pack for Azure DevOps.pbit
- Power BI Desktop is installed and Signed In (Power BI Desktop is a part of the Power BI product suite. It allows you to connect to multiple data sources, transform and model your data, and create reports. Learn more by clicking this link).
The process is divided into 3 main steps:
1. Create a Power BI Workspace.
2. Create a report using the PPM Express Report Pack for Azure DevOps in Power BI Desktop.
3. Publish PPM Express Report Pack for Azure DevOps to Power BI App Workspace.
Create Power BI Workspace.
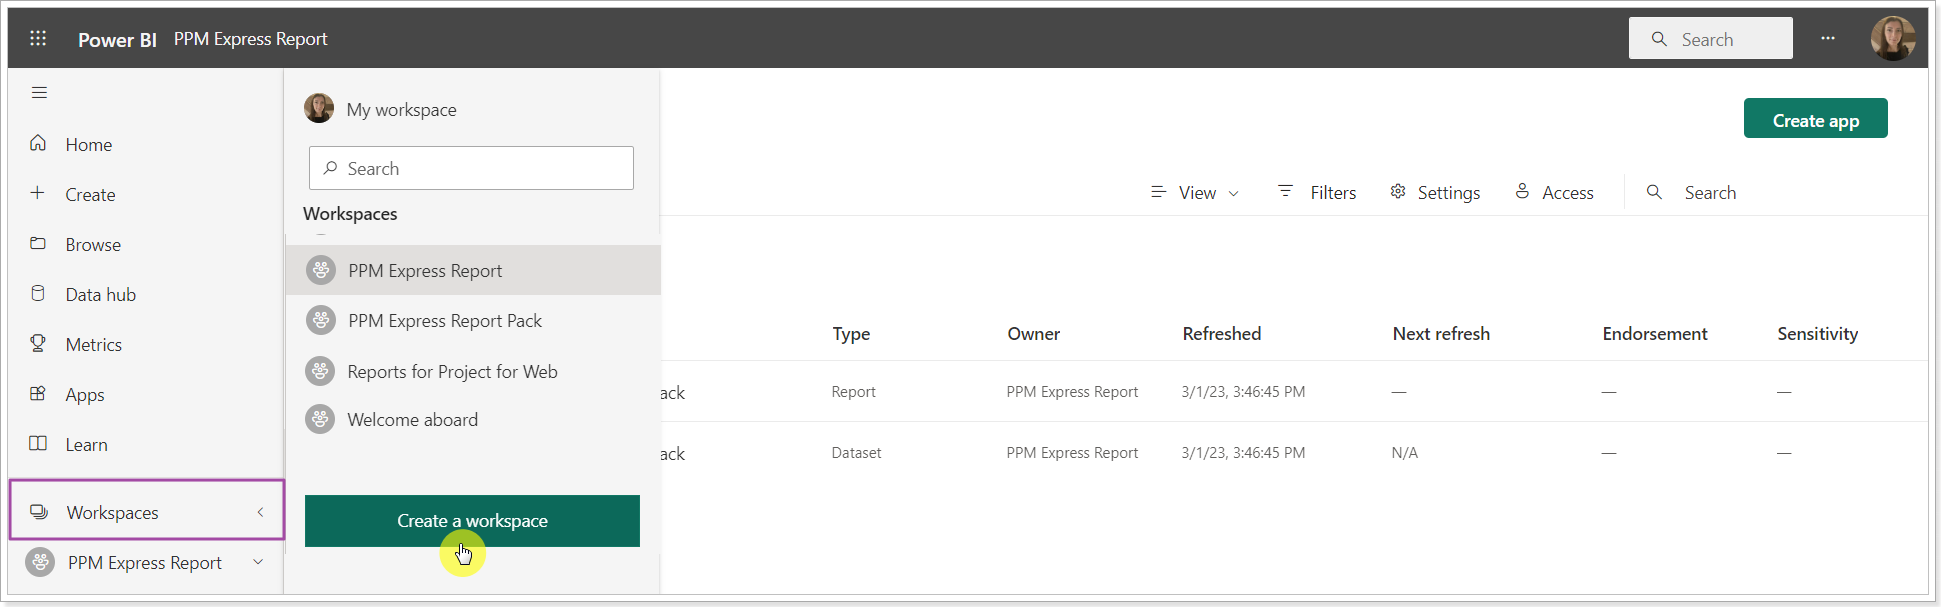
1. Navigate to the Power BI service and click on Workspaces.
Select the Create a workspace option.
2. Create a new workspace, providing the required information:
- Upload an image that will be used as a workspace cover.
- Type in the workspace name.
- Populate optional description.
- Click Save once you are done.
3. A newly created Workspace is ready. You can now proceed to the next step.
Create a report using PPM Express Report Pack for Azure DevOps in Power BI Desktop.
1. Launch Microsoft Power BI Desktop. Sign in to it with the same account you created a Workspace in Power BI service in the previous step.
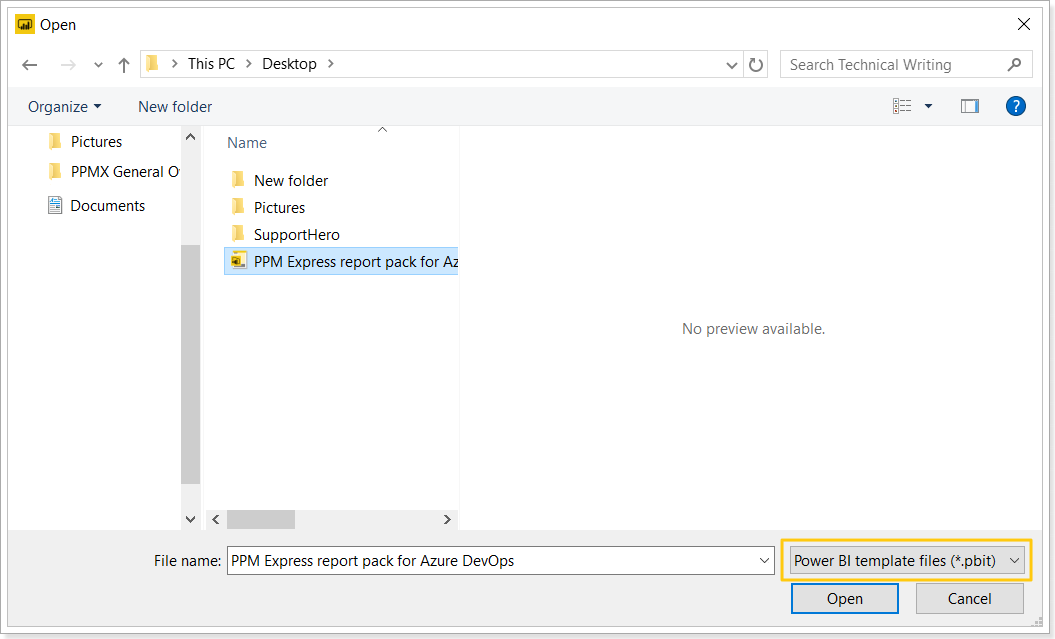
2. Click File >> Open. Navigate to the folder to which the "PPM Express Report Pack for Azure DevOps" file was downloaded.
Select the file extension dropdown in the bottom right corner of the window and choose the 'Power BI template files (*.pbit)' file type.
Open the "PPM Express Report Pack Azure DevOps" .pbit file.
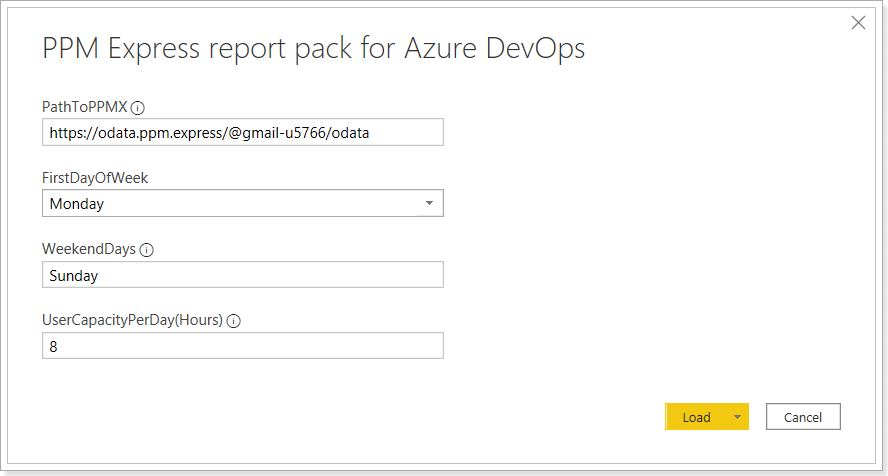
3. Power BI Desktop will prompt you to provide the path to PPM Express.
To get the path, open PPM Express. Click on the gear-like button and choose Reporting.

4. In the Report Settings, you can find the OData URL – this is a URL link to the PPM Express instance that you can use to connect to PPM Express OData.
Copy the OData URL.

5. Paste the URL to the Power BI Desktop dialogue window.
Provide the First Day of Week, Weekend Days, User Capacity per Day and click Load.
6. Next, open PPM Express >> Report Settings page and select the Create access token option.
In order to be able to access data and create reports, a password is required. In PPM Express, you can create a token, that can be used as a password.

To create a token, perform the following actions:
1. Click Create access token.
2. Specify the Token title.
3. Click Generate token.
4. Copy the token to the clipboard.

Make sure you copy the above token now. We don't store it and you will not be able to see it again.
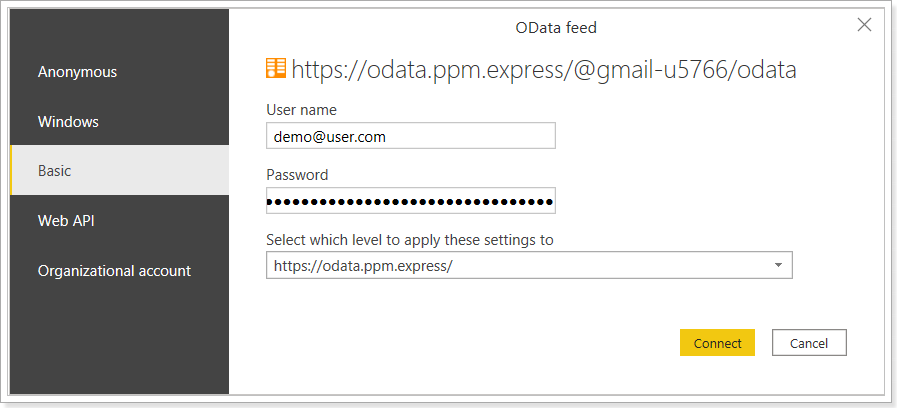
7. Power BI Desktop will show a window to provide authentication.
Choose the Basic type.
For the user name provide the account you use to log in to PPM Express.
In the password field paste the token you copied from PPM Express after clicking the 'Generate token' button.
Click Connect to proceed.
Power BI Desktop will connect to PPM Express OData with the credentials you provided and will load the data to the report.
The loading process may take some time depending on the number of PPMX Projects you have linked to Azure DevOps projects.
As the process finishes you will see data appearing in the report. You can click through the report tabs to review it.
8. Save the generated report to your machine by clicking File >> Save As.
Publish PPM Express Report Pack for Azure DevOps to Power BI Workspace.
After the report is generated in Power BI Desktop and saved, you can publish it to the workspace in the Power BI service.
1. In Power BI Desktop click Publish.

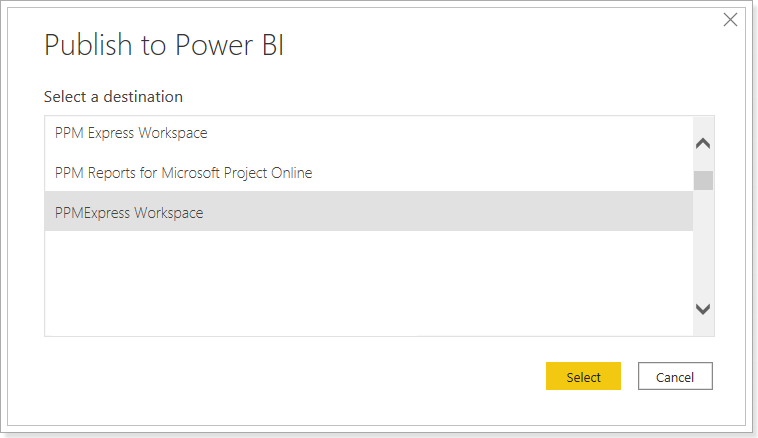
2. The dialogue window will appear, which allows choosing the Workspace to which you can publish this report.
Choose the workspace name, which was created in the first step of this article.
Then click Publish.
3. As the publishing process finishes, go back to the Power BI service, and open the workspace to which you published the report. 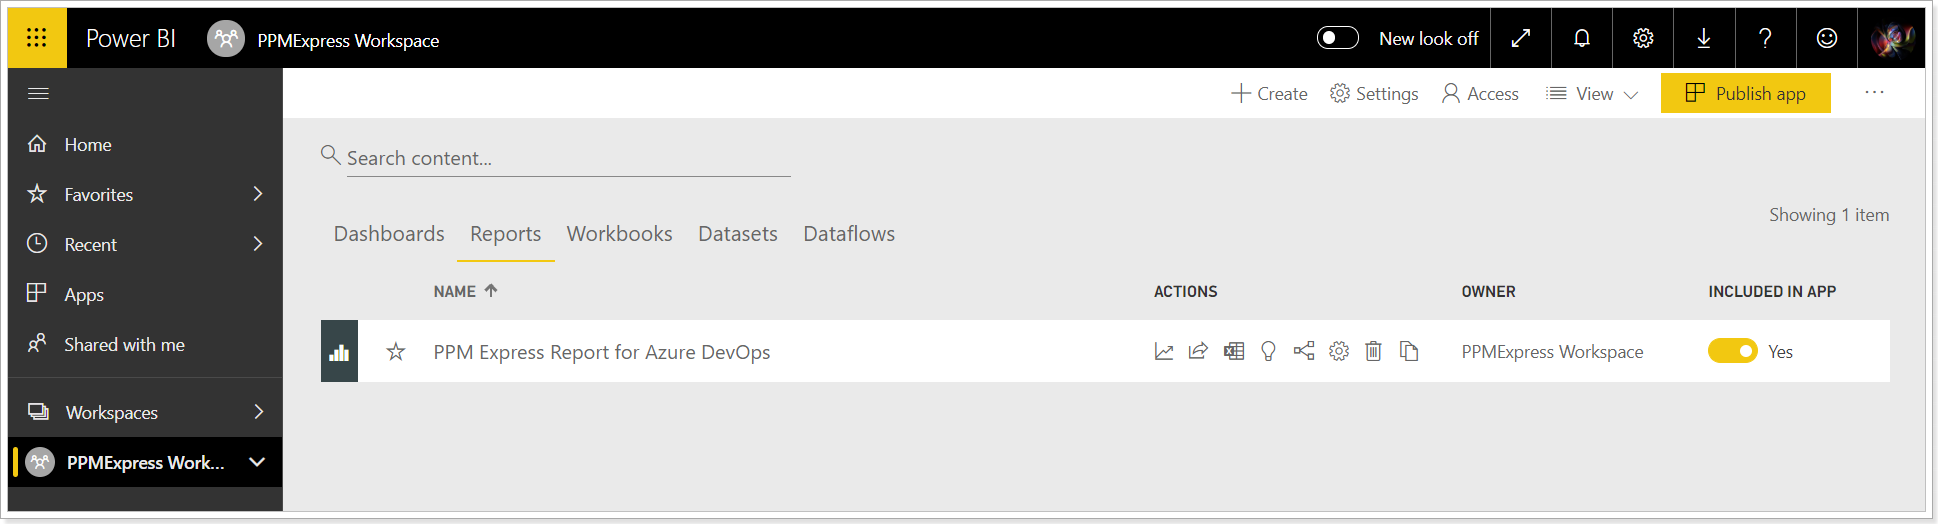
Congratulations! You can now share the report with your organization to review the time management of PPM Express Projects, linked to Azure DevOps projects.
PPM Express provides the ability to add custom reports to the Report Settings page and to navigate to the reports from different PPM Express pages directly (Projects, Portfolio, Programs, Resources, Objectives, and Challenges).
It is required to add the Azure DevOps report pack as a custom report to PPM Express and provide the report home page URL to PPM Express. If you select to open any PPM Express report from these pages, the Power BI service will be opened in a new tab, and information for the selected report will be displayed.
Navigate to the published PPM Express report in Power BI, open its Home page, and copy its URL, including the Report ID (which comes after the 'report' word) and excluding the rest.
It is important because you publish a report file using your own Power BI account. The published report resides in the workspace of the account you used. To let the PPM Express App navigate to the published report in the Power BI service, the PPM Express App has to be aware of the report URL address.

Return to the PPM Express Reports Settings page and click on the New Custom Report button.
On the New Report page type in the name for your report and paste the report URL into the Report URL field.
In the Scope field select the PPM Express pages where this report will become available.

Click Create Custom Report.
The report will become available on the Report Settings page and on other PPM Express pages that you selected in the Scope field.
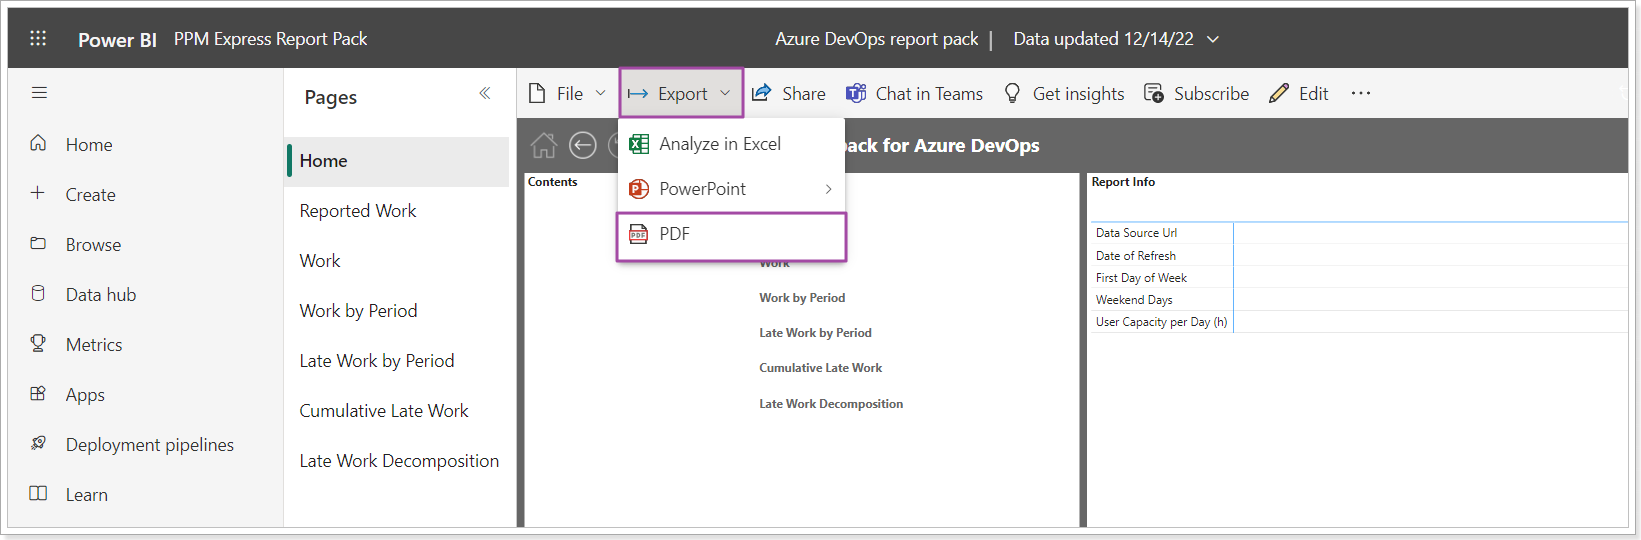
If you need to export the report, we recommend exporting it to PDF first: Export => PDF.
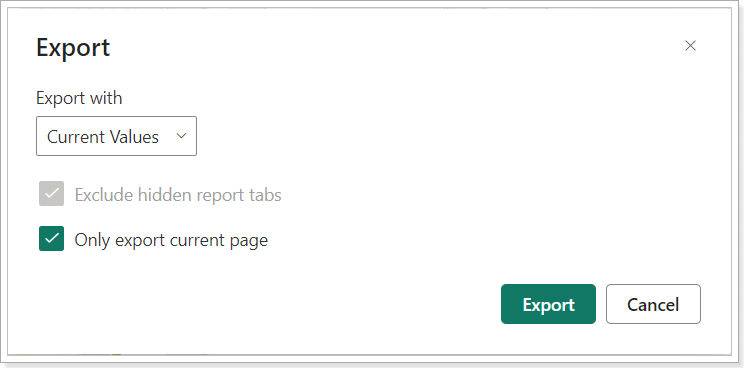
If you click File => Print this page instead, please make sure to enable the 'Background graphics' checkbox in the print preview dialog to get all the boxes to appear and include colors.